Thursday, February 28, 2013

Challenges


This week's challenge at DRS Designs is to create a Sympathy card. Here's what I came up with.


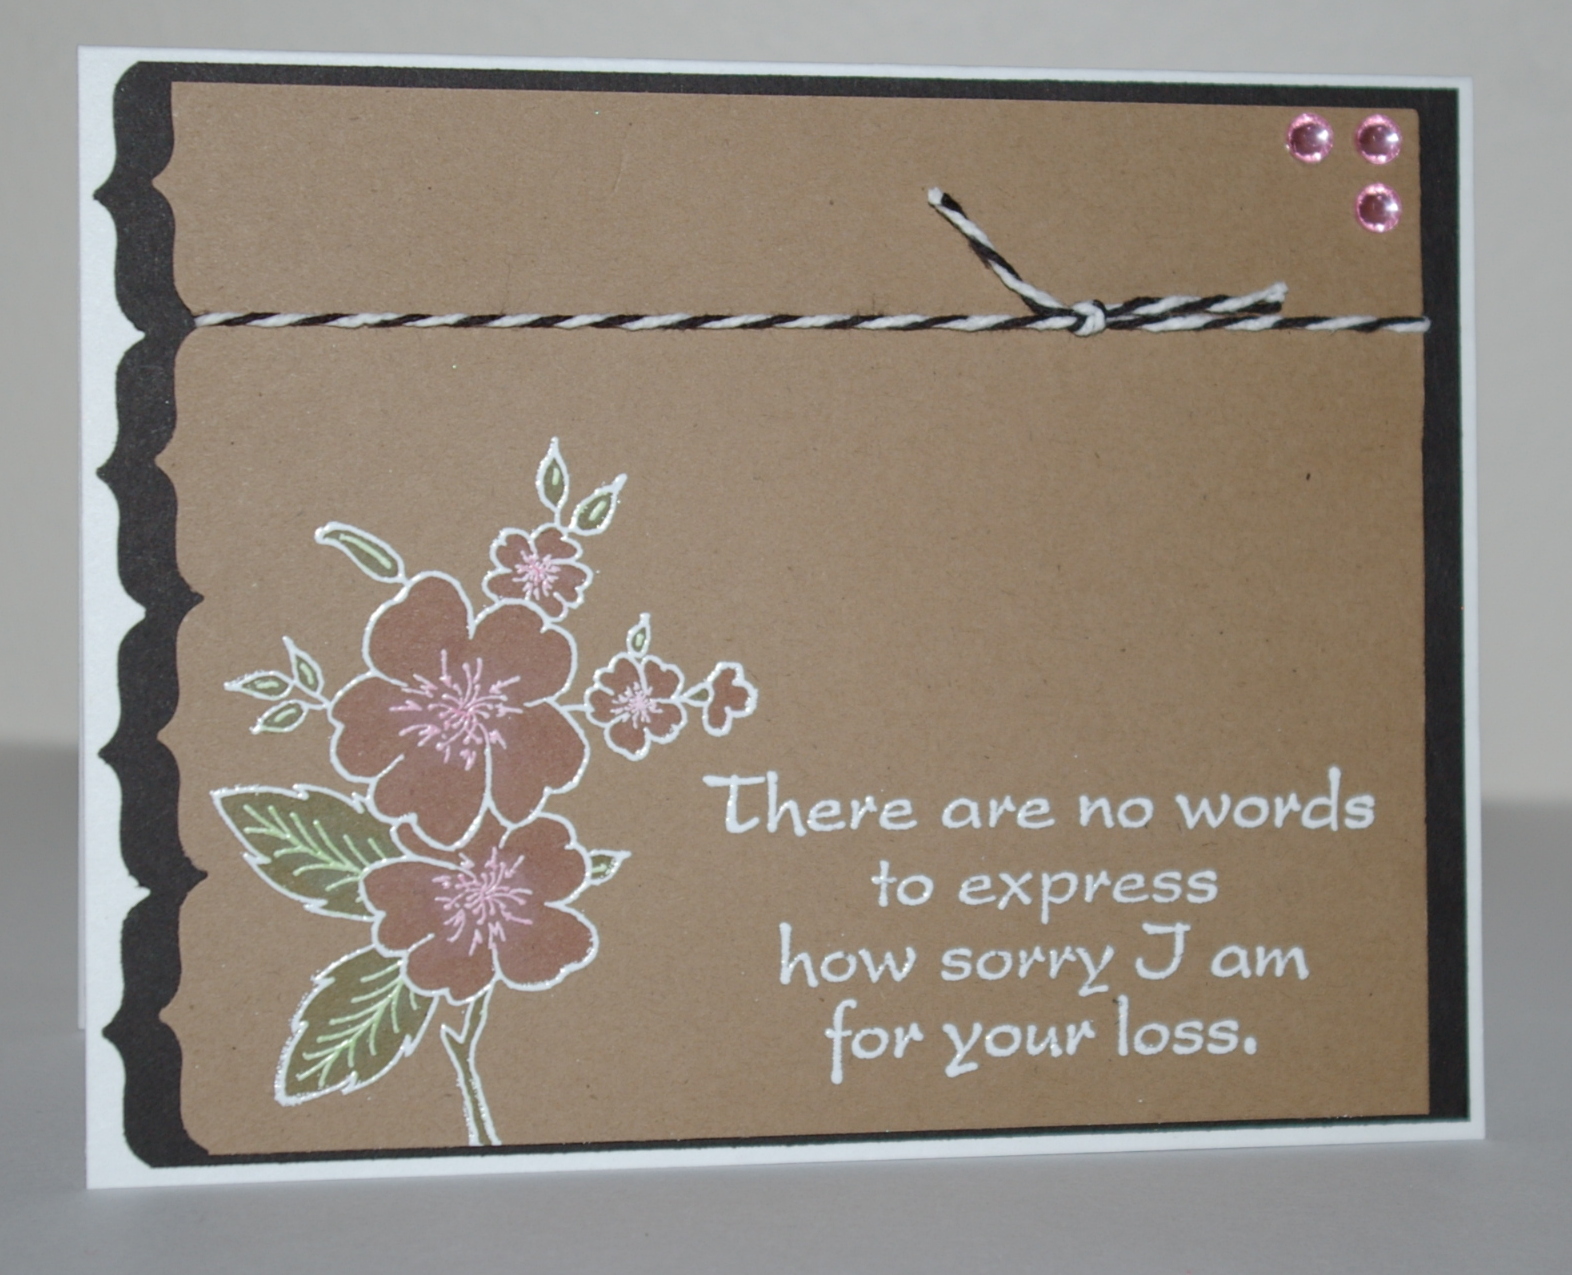
The Dogwood Branch is stamped in VersaMark on kraft CS, embossed with detail white embossing powder and then colored with Copics. I really like the look of this. The sentiment was also stamped in VersaMark and embossed with detail white powder. To finish the look the left side was punch with a Fiskars border punch, black bakers twine was added along with some pink dew drops. The entire panel was attached to a black panel that was also punched with the same border punch and then attached to a white base.

For this week's Merry Monday Challenge #51 we got to chose three items from the tic tac toe board. I chose red, punches and snowflakes.


 The card base is Real Red with a layer of DCWV glitter white. On top of this is a Real Red panel that was punched with a snowflake border as well as a MS Punch Around the page snowflake. Red gingham ribbon and white lace were added to the left side along with a bow. The sentiment is part of the Christmas Multi Greeting from DRS Designs. I only inked the tiny Merry Christmas part, cut it out with a small circle nestie and attached it to a white snowflake that I punched with an EK success snowflake punch.


The next card is for this week's Seize the Birthday Challenge #8. We were to use the same sketch as last week and make a masculine card. A friend and I got together at her house recently to stamp and she had this set from SU that I stamped and paper pieced. I didn't get the name of the stamp set. I believe the sentiment is also a part of the set, but I can't remember.


The card base is Mellow Moss with a layer of So Saffron that was embossed with a Fiskars embossing plate. The main image was stamped on white and paper pieced. I used some chalks and copics to color my chef's face and the tray with the cheese, wine and grapes. The chef panel is layered on some mellow moss that was die cut. A small strip of mellow moss was border punched and attached under the main image. A brad was added to finish the look.


Thanks for stopping by. Hope you can join in the challenges this week!!

Until next time,
shelia                                            

Monday, February 25, 2013

When God Created You


Hope everyone is having a great start to their week! This is a busy week for me, but I hope to find some time  to get in my stamp room and create. It's a great way for me to relax and unwind!

Today I have a card that features Shelldon the Turtle. I think he's the cutest thing with those dots and hearts on his shell! He's stamped on white CS, colored with Copics and fussy cut. He's paired with the When God created you greeting and the Turtle Trail image.


I started with a white card base, added a layer of blue and then a layer of red that was stamped with the interlocking flower background in Real Red ink. A blue strip was punched with a MS lace punch and added to the left side of the red layer. The Turtle Trail was stamped in Memento Black on white CS, colored with Copics, sponged with some Mellow Moss and More Mustard inks. It is matted on some red and blue CS and attached to the bottom of the red panel. The greeting was stamped in black on white, layered on the same red and blue. The blue button was attached with some red bakers twine. And finally Shelldon was added with some pop dots to give some dimension.  Hope you like it!!

And I hope you are playing along in our challenge this week to use plaid on your cards. You can see details here. We'd love to have you join us.

I have the latest clue for you in our Stamp-A-Versary contest.  I don't know about you, but I'm trying to figure which 4 stamps have been with us since the beginning!!  There are some great prizes to be won!!


Play our new game!!
Find the 4 current stamp designs that were featured in our
original stamp catalog way back in 1992 and win prizes!
Click here for all the details

Today's Clue


Mystery Stamp B
Clue #2:

No saluting required

The clues.....so far!

Mystery Stamp AMystery Stamp BMystery Stamp CMystery Stamp D
Play your cards right and you can win!
No Checkers on this board.
Varoom!
Oh square of squares.
It is a big deal!
No Saluting required
Coming Soon!
Coming Soon!
Coming Soon!
Coming Soon!
Coming Soon!
Coming Soon!
Coming Soon!
Coming Soon!
Coming Soon!
Coming Soon!
Coming Soon!
Coming Soon!
Coming Soon!
Coming Soon!


Good luck and thanks for stopping by!

until next time,
shelia

Saturday, February 23, 2013

Challenges


Today I found time to play in the Inspiration Challenge at Splitcoast Stampers. We were sent to Designs by Lucinda for inspiration. She has some beautiful pins and I had fun looking through her site. In the end I was inspired by her many flower pins.  Here's the card I created.


The card base is cream card stock with a layer of orange CS that was embossed with the CB honeycomb folder. I love the look of this embossing folder. I took a strip of cream CS about an inch wide, stamped my sentiment in Memento black ink before running it through the honeycomb border folder. The prima flowers are held together with glue dots. A dew drop was used for its center. The Bitsy Bee was stamped with Memento Black ink on white CS, colored with Copics, fussy cut and attached to the flower with a pop dot. I added some glitter to his wings to make him sparkle. I love the look of this CAS card.


I am always needing birthday cards, so I've been attempting to play along with the Seize the Birthday Challenges. I haven't been too consistent, but at least I'm getting some birthday cards created!!  Here's the sketch we were to use this week.


My card uses the ODBD Special Girl stamp set. I have two precious granddaughters and I think I'll be using this set to create their cards this year. It is such a cute castle and I love the sentiments that go with.


The castle image is stamped in Memento black, colored with Copics and die cut with Nesties Labels 8. The side was trimmed so the image would fit. The Pretty in Pink panel was embossed with the CB Swirls folder, layered on a Bashful Blue panel and attached to a white card base. The sentiment was stamped in Memento black ink, die cut with Memory Box pennant dies, layered on pink and blue. Satin white ribbon was added to the strip of blue after punching the edges with a scalloped border punch. To finish it off I added some glitter with a Sakura Gelly Roll pen.

Thanks for stopping by.

Until next time,
shelia

Friday, February 22, 2013

An Elegant Christmas

We got a couple of inches of snow early this morning, so today was a good day to stay indoors and get creative!!

This week's challenge for Merry Monday is to create an elegant Christmas card. I think white on white cards are very elegant, so I decided to go that route.


The card base is white with a layer of white card stock that was embossed with the CB snowflake folder. On top of that is a white eyelet pendant made with a Spellbinders die. Next is a white tree created with a Cheery Lynn die. Small white half pearls were added to the tree and eyelet pendant. The sentiment, Silent Night Holy Night was stamped with Silver ink and heat embossed with silver powder. A nestie fancy label die was used for the sentiment. A white ribbon and bow were added to finish it off. I really like the result!

Thanks for stopping by.

Until next time,
shelia

Monday, February 18, 2013

Goodbye Winter!!


In keeping with my desire to see winter go and spring come, my card today features just that!! I think this Goodbye Winter greeting is just so cute and perfect for how I'm feeling right now. I'm so ready for spring and flowers!! and yes, even bumble bees!!!


I started by stamping the interlocking flowers in Bashful Blue on white card stock and then used a yellow Copic marker to color the centers of the blue flowers. The greeting was then stamped in Memento Black ink. This was die cut with nestie squares and layered on some Bashful Blue card stock. The Bitsy Bumble Bee was stamped in Memento Black on white card stock and colored with Copics before being fussy cut and attached to the square with a pop dot.

The card base is Bashful Blue with a layer of yellow that was embossed with the CB Honeycomb folder. A strip of bashful blue was embossed with the border honeycomb folder and attached to the yellow panel after attaching a sheer blue ribbon and bow. Some blue and white daisies were punched and added to finish the look. Some yellow Fiskars dew drops were added for the centers of the flowers.

Thanks for stopping by today and taking a look. If you haven't joined in the challenge here at DRS Designs, you still have time. This week the challenge is to use the work Love on your card. We'd love to have you play along. And remember to keep watching for our 20th Anniversary Fun that's coming soon!!

Until next time,

shelia

Monday, February 11, 2013

Happy Retirement & Merry Monday


I don't know about you, but I am a bit tired of the cold. And I'm positive that those of you in the NE are really tired of the snow. Wow, that was some storm. With that in mind, I'm in the mood to stamp flowers!! So today I have a retirement card that features the Polka Dot Flower Trio.

I saw a technique on Stamp TV that I thought was interesting and used it for this card. I stamped the Polka Dot Flowers and Retirement sentiment in VersaMark ink on kraft card stock, embossed both with detail white embossing powder, then colored the image with Copic markers. I really like the look.


After coloring the image with Copics, I embossed the top half of the kraft CS with the CB Swiss dots embossing folder. This panel is layered on black CS. A white ribbon was added before attaching the panel on the white card base. This was an easy and fun way to stamp and color. Hope you like it!

Below is a card I made for Lesley's Merry Monday Challenge. You can see details on her blog. It's a sketch challenge to create a Christmas card.


The card base is SU Bashful Blue CS. The DP is from DCWV which was embossed with the CB snowflake embossing folder and then sanded. This was the Technique Lovers Challenge at Splitcoast Stampers today. This panel is layered on some navy CS and attached to the card base. The vertical panel is the same navy CS that's also embossed with the snowflake folder. The large Merry Christmas was stamped in Memento Black ink on white CS, cut with nesties and sponged with Bashful Blue ink while still in the die. Some blue ribbon was added to complete the look. This is my first Christmas card for February. I try to make 5 Christmas cards each month so I don't have that rush close to the holiday!!

Remember this week our challenge is to use the word "love" on your card. With Valentine's Day this Thursday it should be fairly easy to join in the fun! You can see details here.

Thanks for stopping by today!

Until next time,
shelia

Saturday, February 9, 2013

Birthday Wishes

I am always needing birthday cards, so I was glad to discover the Seize the Birthday Challenge. Today's card was created using their sketch. The inspiration for my card came from Splitcoast Stampers Inspiration Challenge to use An Angel at my Table.  I had fun looking at the items on this site. I have a fondness for dogs, so I was inspired by this.


I started by stamping my puppy image in Memento ink on white card stock and then stamping over him with the polka dot background stamp, also in black ink. After fussy cutting the puppy, I attached him to an oval nestie cut from Perfect Plum CS that was stamped with the dog paw background stamp in VersaMark ink. It's hard to see in the picture, but it's there. This oval was layered on a white scallop oval and then on a larger plum oval. The top white panel was embossed with an embossing folder of paw prints, layered on perfect plum CS and attached to the white card base. The smaller white panel was stamped with the dog paw background stamp in VersaFine Lavendar ink, then the Birthday Wishes sentiment was stamped in black ink. This is also layered on perfect plum. Some purple bakers twine was added to the side with a purple button to finish it off. Hope you like it.

Thanks for stopping by today.

Until next time,
shelia

Thursday, February 7, 2013

Love Challenge & Tuesday Morning Sketch Challenge

This week's challenge at DRS Designs is to use the word "Love" on your card. I decided on this sentiment from DRS Designs Fall into Chocolate Greeting for my card today. I think it's a great sentiment!! Who doesn't love Chocolate. Sometimes I wish I loved it a little less!  :-)


The sentiment is stamped in Memento Cocoa ink on white CS, colored with Copics, then cut with oval nesties. The background was created by stamping the Chocolate chip Background stamp in VersaMark ink, and heat embossing with brown embossing powder. This piece was layered on Choc. Chip CS and attached to the white panel. The bottom pink panel was embossed with the SU heart EB, layered on Choc. Chip CS that was punched with a scallop border punch. Some brown and pink ribbon was added before attaching it to the card base. The giant Choc. Chip was stamped in VersaMark ink on white CS and embossed with the same brown embossing powder as the background. After heat embossing, it was fussy cut and attached over the ribbon to complete the card. Hope you like it. I think I'm gonna go look for some chocolate to eat now. This card is making me hungry for chocolate!! We'd love to have you join us in this week's challenge. You can see the details here.


Have you heard? The Stamp-A-Versary contest begins soon over at DRS Designs! You have a chance to win a 20 stamp prize package from DRS Designs in honor of their 20th Anniversary!!!Stay tuned for more details

I really like the sketch at Tuesday Morning Sketch Challenge this week, so I had to create a card for it. This is also for today's Ways To Use it at Splitcoast Stampers.


I started this by stamping the Shamrock background stamp in SU Old Olive ink on Bazzil Rain Forest CS. This was layered on black CS and attached to the white card base. The pennant is white CS with shamrocks punched from the same Bazzil CS. These were glued onto the white CS and then embossed with a CB folder before layering it on the black pennant. The main image was stamped in Memento Black on white, colored with Copics and cut with nesties. The tiny Happy St. Patrick's Day was also stamped in Memento Black ink. It's a pretty easy sketch and I like the look.

Have a great day and thanks for stopping by!

Until next time,

shelia

Monday, February 4, 2013

LOVE


Well, I hope you all had a great weekend. Did you watch the super bowl? My husband and I got together with friends for dinner and then the game. We ate way too much food, but it was great fun.  I was cheering for the Ravens, so I was happy with the game!  :-)

Today I have a Valentine card to share with you. DRS Designs is the sponsor for 365 Cards this week. Today's challenge is Top Trends. We are to use something trendy on our card. Well I've seen a lot of banners and pennants on cards recently, so I went with that trend.


The pennnants were created using DRS Designs' Material Maker Square. I stamped this on white CS with Pretty in Pink ink once and then re-stamped it turning the stamp about 45*. This makes the card stock look like cloth. The pennants were die cut with the SB Lacey Pennants die. The Stacked LOVE image was stamped in Memento Black ink on white CS and fussy cut, then colored with Copics and glued onto the pennants. The pennants were strung together with black Baker's twine. Before attaching the pennants to the Pretty in Pink layer, I stamped it with the Filigree Heart in Pretty in Pink ink to create the subtle background. The sentiment was stamped in Memento Black on white CS, die cut with a SB banner die and attached to the panel with glue dots. The whole pink panel was attached to black CS and then to a white base. A small pink heart button with some Baker's twine was added to finish it off. I hope you like my "trendy" card.

If you have time, we'd love to have you join in the challenges this week at 365 Cards. There's still time to play in DRS Designs' challenge this week to use brads on your card. You can see the details here.

Thanks for stopping by.

Until next time,
shelia