Monday, February 29, 2016

Happy Leap Year!

Since today is February 29, I thought I'd honor Leap Year by sharing a card featuring one of my favorite DRS Designs frog images. I think this guy is so cute!

I started by stamping and coloring the Friendly frog image, then I stamped the background with TH Brushed Corduroy Distress and  SU Old Olive inks using the easy dot background image. The Un"Frog"gettable greeting was stamped with Versafine Onyx Black ink, die cut and layered on a yellow strip. Some green dew drops and burlap ribbon complete the look.

This card also works for the DRS Design challenge: A Hop, Skip or Jump. You still have a few days to join in the fun!

I"d also like to enter this in the following challenges:
Send A Smile 4 Kids. Anything Goes Challenge, this is a great challenge for a worthy cause.

Sketch Saturday Week #401  Here's the sketch.
 

Thanks for stopping by and I hope you enjoy this extra day in 2016!
shelia

Thursday, February 25, 2016

Hop, Skip and a Jump


It's Thursday and that means another challenge at DRS Designs. This week the challenge is to use something on your card that hops, skips or jumps. Since I'm in need of some Easter cards for my grands, I decided to go with a bunny for my hopping image.


I used this week's sketch design at Split Coast Stampers. It is a  great sketch. I made this to go with my Easter basket that I created yesterday. It's in the blog post below.

I started by stamping the Cute Bunny on white CS, colored him with Copics and die cut. The white strip was stamped with the Jelly Bean Jumble and colored with Copics. I used pink, purple and yellow CS to match the jelly beans. After putting it all together I stamped the Happy Easter greeting in Versafine Onxy Black ink.

Be sure to check the challenge. You could be the winner of some awesome new stamps from DRS Designs. You can see details here.

Thanks for stopping by,
shelia

Wednesday, February 24, 2016

MFPSpeedyTV Easter Basket


This Easter basket was created using the tutorial on MFPSpeedyTV. It's a simple basket to create and is really cute. You can see the tutorial here.

To create the basket I started with a 6x6 piece of white CS and stamped it with the Jelly bean background image from DRS Designs. Once I colored the jelly beans, I scored, cut and taped the basket together. The little bunny was stamped on white CS, colored with Copics, die cut and layered on the same purple CS the handle is made with. Some baker's twine completes the look.

I will fill this with some goodies for my granddaughter for Easter. Now to make 4 more for my other grandkids. :-)

Thanks for stopping by,
shelia

Tuesday, February 23, 2016

Tuesday Throwdown & a new background Technique

Recently I discovered a fellow stamper, Jennifer McGuire, who has her own You Tube channel filled with lots of tips, techniques and inspiration. I've been trying out some of her techniques. Today I have a card I created using her Overlap Stamping. I used part of DRS Designs Woven Plaid stamp to create my background with Certainly Celery, Pretty in Pink and Bashful Blue inks, overlapping each time I stamped to create the look of more inks. Here's my card.


Once I created the background, I stamped the butterfly with VersaMark ink and embossed it with white EP. The sentiment was also stamped and embossed with white EP on Certainly Celery CS and attached to the card. You can find this technique along with many others on You Tube under Jennifer McGuire.

DRS Designs is sponsoring the weekly challenge at Tuesday Throwdowns. This week's challenge is Create your own Background - something easy to do with DRS Designs many background stamps, like the woven plaid I used for this card. We'd love to have you join in the challenge.

Thanks for stopping by,
shelia

Sunday, February 21, 2016

Happy Monday

I need a sympathy card as well as an anniversary card this week, so I'm taking a little break from St. Patrick Day and Easter cards. I saw a fun technique using distress inks, masking, perfect pearls and dry embossing that I wanted to try. It is so easy and fun to do. I really like the metallic look the perfect pearls give to the distress inks. You can find details on this technique on the blog here.


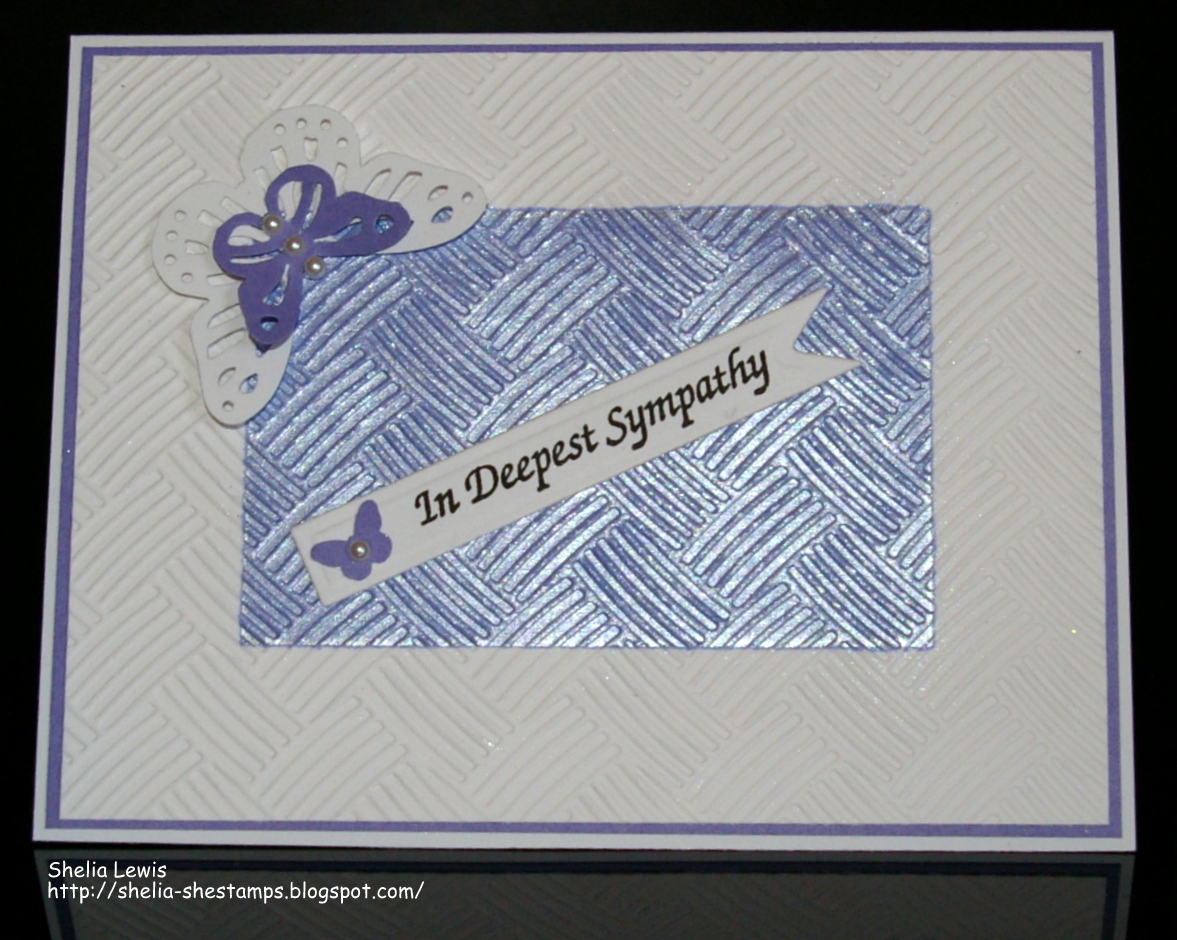
I masked the edges of the white panel so just a rectangle is left. Next I sponged Distress ink inside the rectangle, added perfect pearls, then dry embossed the panel. I layered each on matching CS, then onto the white card base.

The In Deepest Sympathy is part of a larger sentiment. After stamping it in Versafine Onyx ink, I die cut it with a banner die, and added a small punched butterfly. The large butterfly was created with a MS punch. Some half pearls were added to the butterflies.

For the anniversary card, I die cut the white flourish heart with a nestie, sponged the same distress ink along the edges. The Happy Anniversary was stamped with Versafine Onyx ink, cut with a banner die and also sponged with the pink distress ink.

These cards could also work for this week's color challenge here at DRS Designs. We'd love to have you join in. You can see details here.

Thanks for stopping by,
shelia

Monday, February 15, 2016

Happy Easter


Today I have an Easter card to share with you that features the new Happy Easter Cross. I love how the cross is the "t" in Easter. It's an easy design to color as well. To create my card, I started with white CS and sponged on SU Barely Banana ink using a TH stencil. After layering this onto yellow CS, I added some purple ribbon and then the main image. Everything is attached to a white card base. I really like the way this card turned out. I may be making more of these to send to family and friends for Easter this year.

This week's challenge at DRS Designs is a fun one: Hot or Cold? You just need to mainly use either hot or cold colors. Here's the color wheel to help you out.


We'd love to have you join in the fun! The randomly selected winner gets to choose two stamps from DRS Designs on line catalog. Now that's a fabulous prize!

Thanks for stopping by,
shelia


Thursday, February 11, 2016

Challenges

This week's challenge at DRS Designs is Hot or Cold. You have to use mainly hot or cold colors. Here's the color wheel to help you out.


And here's the card I created for the challenge.


I started by creating the plaid background using DRS Design's woven plaid background stamp that's been cut apart making it easier to use two colors. I used SU Old Olive and More Mustard. The new Shamrocks and Shenanigans greeting was stamped on white CS, die cut and some More Mustard was sponged on while still in the die. I also stamped the Small Shamrock Group in the center of the greeting with More Mustard ink. The large shamrocks were made with a MS punch. More Mustard was sponged on the edges of these shamrocks and a rhinestone added to the center of each. Everything is layered on Old Olive CS and then on the white card base.

Hope you can find time to play along with DRS Designs this week. One lucky winner from all the entries will get to choose two stamps from DRS Designs' on line catalog. That's a great prize!

My next card is for Our Daily Bread's Shining Light Challenge #270, a sketch challenge. I always enjoy doing sketch challenges.  Here's the sketch:


Here's my card.


I pretty much let the dps and dies do the work for me on this card. The greeting is part of ODBD's Get Well set. I used a Memento Black pen to ink just the first part of the get well greeting for this card. I used ODBD's Lacey Square dies and Stitched Oval dies as well as a SB oval die. I didn't have any ribbon to match so I punched several bows with a MS punch, glued them together and added a white pearl that I colored yellow with a Copic. You can see details for this challenge here.

Thanks for stopping by,
shelia

Monday, February 8, 2016

Rainbow Gold


Hi Everyone. My card today features DRS Designs' new Rainbow Gold Greeting. As soon as I saw this greeting I knew I wanted a rainbow to go with. I decided to try and create one using a SU border die. I die cut the border in rainbow colors, then cut off the ends so only the curved part remained. After attaching the curves to some white CS, I cut away the excess white so only the rainbow remained. The blue panel was embossed with a CS swirl folder after stamping the greeting with VersaFine Onyx Black ink. The rainbow was attached with foam squares and then I added some sequins around the greeting to represent the gold. This was a fun card to create.

Have you checked out this week's challenge at DRS Designs: Lucky Charms? You still have time to join the fun. You can see details here.

Thanks for stopping by,
shelia

Monday, February 1, 2016

Happy Easter


We have had a fabulously warm weekend here in NW Ohio. We're talking just a sweatshirt or light jacket which is unheard of for January. This time last year we were buried in snow! All this warmth has me dreaming of spring and that led to this Easter card. I used the new Cute Bunny for this CAS card. After stamping and coloring the little bunny with Copics, I stamped the Happy Easter greeting with Versafine black onyx ink and then added the yellow layer. I wanted to add the ribbon with a button, but couldn't find a green button in my stash to match, so I created the button. I just punched 5 circles, added the button holes, glued them together, colored it with the same green Copic, added some Glossy Accents and waited for it to dry. This was the hardest part for me.

I really like CAS cards. Not just because they are easy to create, but I really like the open white space. I'm thinking I'll be making a few more of these for my grandkids for this Easter.

Have you checked out this week's challenge at DRS Designs: Sparkle and Shine? We'd love to have you play along. You can find details here.

Thanks for stopping by,
shelia